CDK Pipelines from zero
Intro
This is the first of many articles I plan to write about my experience using CDK and CDK Pipelines to deploy infrastructure in a CI/CD manner.
Although this article is quite basic, my intention is to establish the fundamentals and provide a starting point for further exploration.
What is CDK?
The AWS Cloud Development Kit (AWS CDK) is an open-source software development framework for defining cloud infrastructure in code and provisioning it through AWS CloudFormation. CDK supports multiple programming languages such as TypeScript, JavaScript, Python, Java, C# and Go.
What is a CDK Pipeline?
A CDK Pipeline is a construct provided by CDK that enables you to define and manage continuous delivery pipelines as code. When you commit your CDK application source code to your repository, CDK Pipelines can automatically build, test, and deploy your new version.
What is a Pipeline?
A pipeline is a set of automated processes for delivering code changes from version control to production. It typically consists of stages such as source, build, test, and deploy.
What is CodePipeline?
AWS CodePipeline is a fully managed continuous delivery service that helps automate release pipelines for fast and reliable application and infrastructure updates.
The project we are building will create one or more pipelines in CodePipeline.
What is CodeBuild?
AWS CodeBuild is a fully managed continuous integration service that compiles source code, runs tests, and produces deployable artifacts.
This will also be used as part of our pipelines.
High Level Diagram
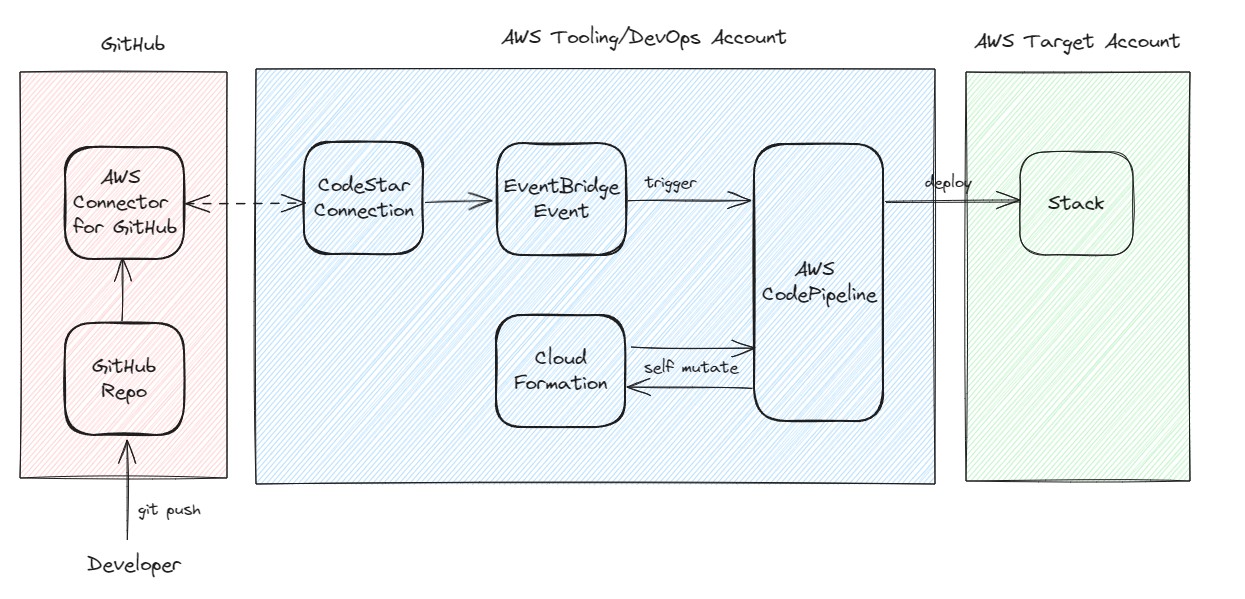
Most of the steps below are very well explained in CI/CD using CDK I strongly recommend reading this article before continuing, since a lot of the concepts I’m gonna use are explained there.
Pre-Requisites:
Install CDK
npm install -g aws-cdkcdk --version- https://docs.aws.amazon.com/cdk/v2/guide/getting_started.html#getting_started_install
Install Python
python --version- https://www.python.org/downloads/
Bootstrap your environment
Before you can use CDK Pipelines, you must bootstrap the AWS environments (Account+Region) involved.
cdk bootstrap XXX/us-east-1 --cloudformation-execution-policies 'arn:aws:iam::aws:policy/AdministratorAccess' --profile MYPROFILE- https://docs.aws.amazon.com/cdk/v2/guide/getting_started.html#getting_started_bootstrap
- https://docs.aws.amazon.com/cdk/v2/guide/bootstrapping.html
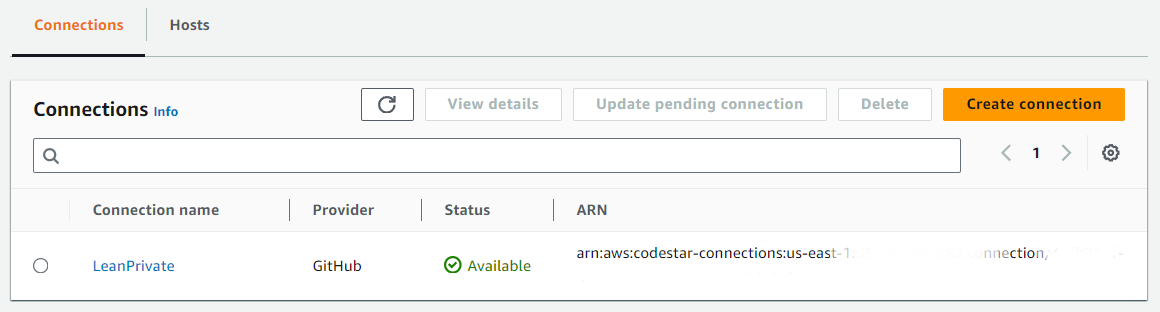
Create an AWS CodeStar Connection
Connections are configurations that you use to connect AWS resources to external code repositories. We are going to use this to connect our AWS Pipeline to our GitHub repository.
- Navigate to “Code Pipeline → Settings → Connections → Create Connection”
- Choose “GitHub”, provide a name for the connection, and click “Connect to GitHub”.
- Click “Install a new app”. This action redirects you to GitHub, where you’ll log in using your GitHub credentials and authorize AWS to access your repositories (you can select the specific ones).
- Once the process is complete, you’ll see the created connection along with its ARN which will be necessary for out code.
Creating the project:
Create an empty folder and open it:
mkdir cdk-pipeline-v1
cd cdk-pipeline-v1
Once inside the folder:
cdk init app --language python
.\.venv\Scripts\activate
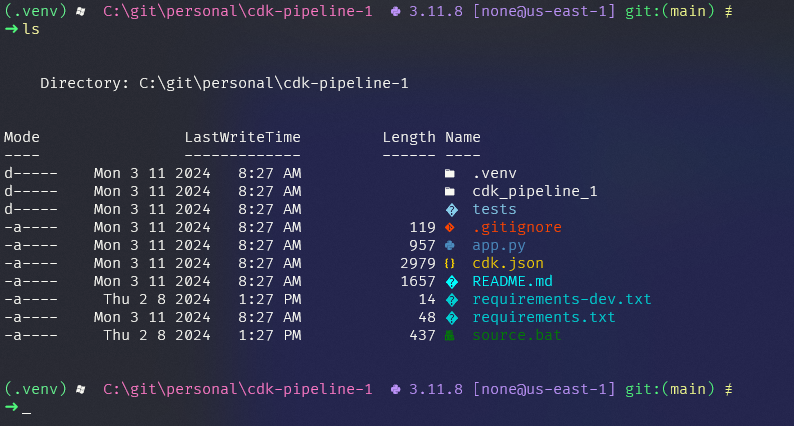
Let’s cleanup the project:
- Delete the
testsfolder. We will incorporate unit tests later, but they are not required at the moment. - Rename
cdk_pipeline_1topipeline - Rename
cdk_pipeline_1_stack.pytopipeline_stack.py
(If you used a different folder name, the name in your project will be different)
Code Changes:
- Rename the class inside
pipeline_stack.pytoPipelineStack - Rename the instantiation of the class in
app.pyto use the renamed classPipelineStack
Install dependencies:
pip install -r requirements.txt
For now let’s focus in these two files only:
app.pythis is our entry point, and what we are doing is creating an instance of our pipeline.pipeline_stack.pythis is our pipeline. (Code will be added in the next step)

Let’s add some code!
Open pipeline_stack.py and add the following:
pipeline_id = "SamplePipeline"
codestar_connection_arn = "arn:aws:codestar-connections:REGION:ACCOUNT:connection/XXX"
repo_string = "your_name/your_project"
We specify a name for our pipeline, followed by the CodeStar Connection ARN (created previously), and details about the repository. This information is essential as the pipeline will automatically trigger itself after every commit made to the specified branch.
Next, we add the connection, utilizing the values we’ve specified earlier.
# Git Connection
source_action = CodePipelineSource.connection(
    repo_string,
    branch="release",
    connection_arn=codestar_connection_arn,
)
If you wish to trigger the pipeline in a different branch, simply replace release with the name of your branch.
Now, let’s add the pipeline code:
# Pipeline
CodePipeline(
    self,
    f"{pipeline_id}-stacks",
    pipeline_name=pipeline_id,
    synth=ShellStep(
        "Synth",
        input=source_action,
        commands=[
            "npm install -g aws-cdk",
            "python -m pip install -r requirements.txt",
            "cdk synth",
        ],
    ),
)
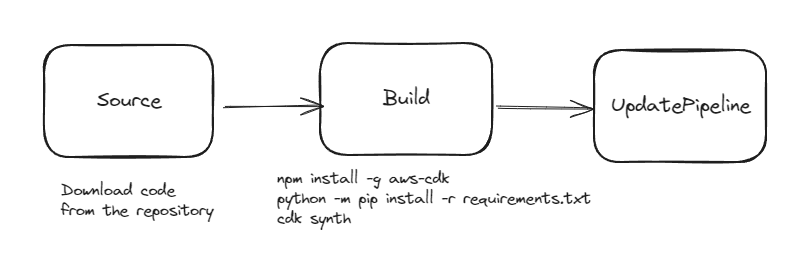
We utilize the previously defined name and source, then execute three commands to install CDK and Python packages on the machine used by the pipeline. Additionally, we run cdk synth, which is the command responsible for converting our CDK code to CloudFormation templates.
It’s important to note that at this stage, we only have a pipeline set up; it doesn’t deploy any infrastructure other than the pipeline itself.
CDK Commands
I usually prefer not to have a default AWS account set up in my CLI. Therefore, I need to add --profile MYPROFILE to specify the profile I want to use. Depending on your setup, you may or may not need to include this parameter at the end of each command.
cdk ls Lists the stacks in our app. If we run this, we’ll see PipelineStack, the only stack we have so far.
cdk synth: Synthesizes the CloudFormation template for each stack. This will generate a cdk.out folder with the output, and also print the output on the screen.
cdk deploy: Deploys one or more stacks. We must deploy our pipeline manually the first time. Then it will be updated through changes in the repository.
Since the pipeline pulls the code from our repository and the release branch, ensure that you have uploaded your code to that branch before performing the first deployment.
For the initial deployment, write in the console:
cdk deploy PipelineStack
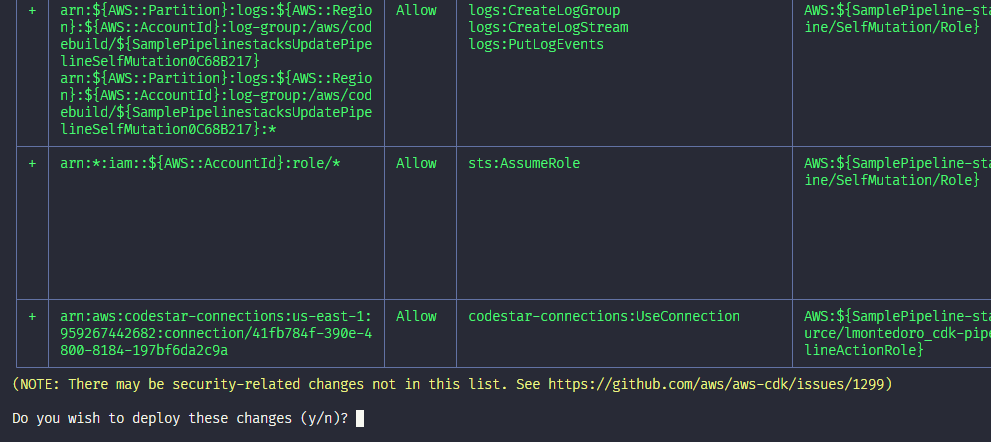
Type y and press Enter to deploy
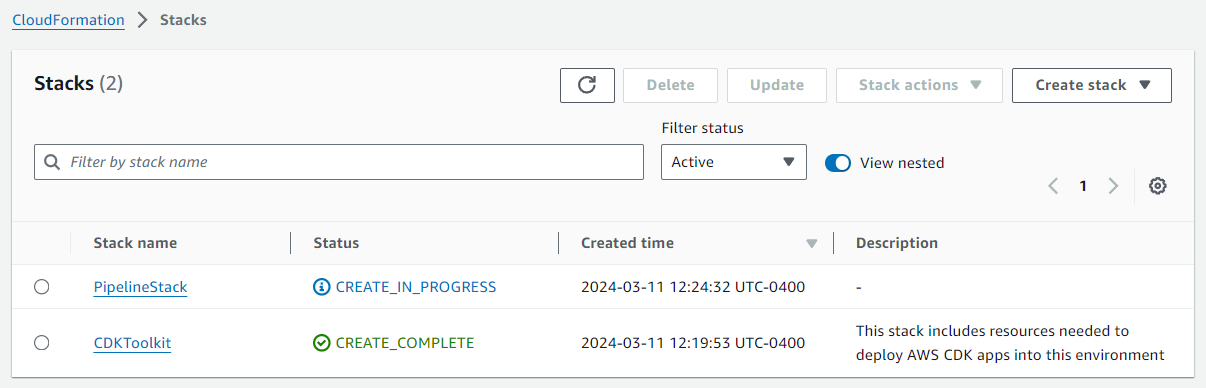
Once the stack deployment finishes, if it completes successfully, we will observe the pipeline in CodePipeline.

Once our pipeline is fully deployed, pushing code to the release branch will automatically trigger the pipeline and update itself as needed.
Cleanup
Pipeline
To delete the pipeline, execute the following command:
cdk destroy PipelineStack
CDK Bootstrap
Remove Bootrapping in the account:
- Delete CloudFormation stack named
CDKToolkit. - Delete S3 Bucket:
cdk-hnb659fds-assets-XXX-us-east-1.
References
Source Code
You can find the source code at: https://github.com/lmontedoro/cdk-pipeline-1/tree/main
References
- https://docs.aws.amazon.com/cdk/v2/guide/cdk_pipeline.html
- https://docs.aws.amazon.com/cdk/api/v2/python/
- https://docs.aws.amazon.com/cdk/api/v2/python/aws_cdk.pipelines/README.html
In the next articles we’ll see how to improve this code, add our first stack and mre features to out pipeline and build.